Before jumping into code, you need to understand what is IaaC i.e. Infrastructure as a Code and what are the advantages of using it.
According to Wikipedia, Infrastructure as code is the process of managing and provisioning computer data centers through machine-readable definition files, rather than physical hardware configuration or interactive configuration tools. Read more...
Advantages of IaaC 🔥
- Speed and simplicity: by running the simple command you can create/destroy the whole infrastructure.
- Configuration consistency: Every time created infra. will be the same. (if code is same)
- Minimization of risk: Humans tends to do a mistake but computers not.
- Increased efficiency: No need to create infra manually every time.
So Terraform is a tool that is quite cool. In this blog post, we will create an Azure Virtual machine that will reside in the VPC and you can access it using SSH.
Spin Azure VM
you can find all code used in this post at https://github.com/lets-learn-it/terraform-learning/tree/azure/00-vm-instance
We will be using VPC with CIDR 10.0.0.0/16 with 1 subnet with CIDR 10.0.2.0/24. We are putting our VM instance in the network security group which allows SSH inbound connections and all outbound connections.
Add Provider block
Provider block tells terraform which kind of infrastructure we want to create. In our example, we are creating Azure. In terraform block, we can give the plugin version we want to use.
provider "azurerm" {
  features {}
}
Create Resource Group
We will create a resource group at the nearest data center. In my case, India will be the nearest data center. Resource group allows us to create all related resources in a single folder-like structure. If you delete the resource group, all resources in it will get deleted.
resource "azurerm_resource_group" "example" {
  name     = "example-resources"
  location = "Central India"
}
V-net and subnet
We will create vnet with CIDR 10.0.0.0/16 with 1 subnet with CIDR 10.0.2.0/24. Our virtual machine will be in this subnet.
resource "azurerm_virtual_network" "example" {
  name                = "example-network"
  address_space       = ["10.0.0.0/16"]
  location            = azurerm_resource_group.example.location
  resource_group_name = azurerm_resource_group.example.name
}

resource "azurerm_subnet" "example" {
  name                 = "internal"
  resource_group_name  = azurerm_resource_group.example.name
  virtual_network_name = azurerm_virtual_network.example.name
  address_prefixes     = ["10.0.2.0/24"]
}
Public IP
To access our virtual machine, we need public IP. public IP can be static or dynamic. Static means after deleting or before creating the resource, IP will be available. but in Dynamic type, it is only available once the resource uses it available. We will be using Dynamic.
resource "azurerm_public_ip" "public_ip" {
  name                = "vm_public_ip"
  resource_group_name = azurerm_resource_group.example.name
  location            = azurerm_resource_group.example.location
  allocation_method   = "Dynamic"
}
Network Interface
A Network Interface (NIC) is an interconnection between a Virtual Machine and the underlying software network. An Azure Virtual Machine has one or more network interfaces attached to it. Any NIC can have one or more static or dynamic public and private IP addresses assigned to it. In our case, we are attaching Dynamic public IP to the network interface.
resource "azurerm_network_interface" "example" {
  name                = "example-nic"
  location            = azurerm_resource_group.example.location
  resource_group_name = azurerm_resource_group.example.name

  ip_configuration {
    name                          = "internal"
    subnet_id                     = azurerm_subnet.example.id
    private_ip_address_allocation = "Dynamic"
    public_ip_address_id = azurerm_public_ip.public_ip.id
  }
}
Network Security Group
We are allowing only SSH connections. The lower the priority number, the higher the priority. By default, NSG denies all connections.
resource "azurerm_network_security_group" "nsg" {
  name                = "ssh_nsg"
  location            = azurerm_resource_group.example.location
  resource_group_name = azurerm_resource_group.example.name

  security_rule {
    name                       = "allow_ssh_sg"
    priority                   = 100
    direction                  = "Inbound"
    access                     = "Allow"
    protocol                   = "Tcp"
    source_port_range          = "*"
    destination_port_range     = "22"
    source_address_prefix      = "*"
    destination_address_prefix = "*"
  }
}
Associate NSG with interface
you can associate NSG with either subnet or network interface. In our case, the network interface is allowing access to the virtual machine. We will associate NSG with network interface as follow,
resource "azurerm_network_interface_security_group_association" "association" {
  network_interface_id      = azurerm_network_interface.example.id
  network_security_group_id = azurerm_network_security_group.nsg.id
}
Create Virtual Machine
Standard_B1s is the cheapest VM available. It will cost less than 1 rupee per hour. Attach network interface which we already created. To access that VM, we need to add ssh key also.
resource "azurerm_linux_virtual_machine" "example" {
  name                = "example-machine"
  resource_group_name = azurerm_resource_group.example.name
  location            = azurerm_resource_group.example.location
  size                = "Standard_B1s"
  admin_username      = "adminuser"

  network_interface_ids = [
    azurerm_network_interface.example.id,
  ]

  admin_ssh_key {
    username   = "adminuser"
    public_key = file("~/.ssh/id_rsa.pub")
  }

  os_disk {
    caching              = "ReadWrite"
    storage_account_type = "Standard_LRS"
  }
Output
We will output public IP so that we can connect to the machine using SSH.
output "public_ip" {
  value = azurerm_public_ip.public_ip.ip_address
}
Create Infrastructure 🛠
Initialize Terraform Plugin
We need to fetch terraform's Azurerm plugin before we start to create infrastructure. you can initialize the plugin using the following command,
terraform initCheck Plan
before creating AWS EC2, we can check the plan of infrastructure which can tell what resources terraform will create. To check plan, run following command,
terraform planCreate Infra
Finally, we can create infrastructure. but make sure you are logged in to Azure using the cmd line. Run the following command to create our Azure Virtual machine. When it ask Enter the value: , give it yes.
terraform applyAfter applying, you may not get public IP as output. So please run, terraform apply again. does anybody have any idea, why it is happening? I reran it.
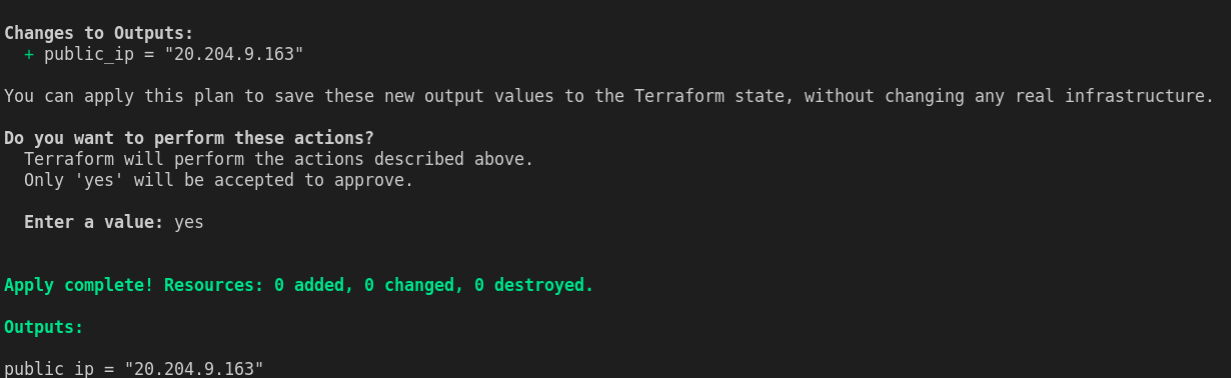
you will get public IP as I got 20.204.9.163. We will connect to the machine using SSH. Just make sure, you know the passphrase of the SSH key pair.
ssh -i ~/.ssh/id_rsa adminuser@20.204.9.163
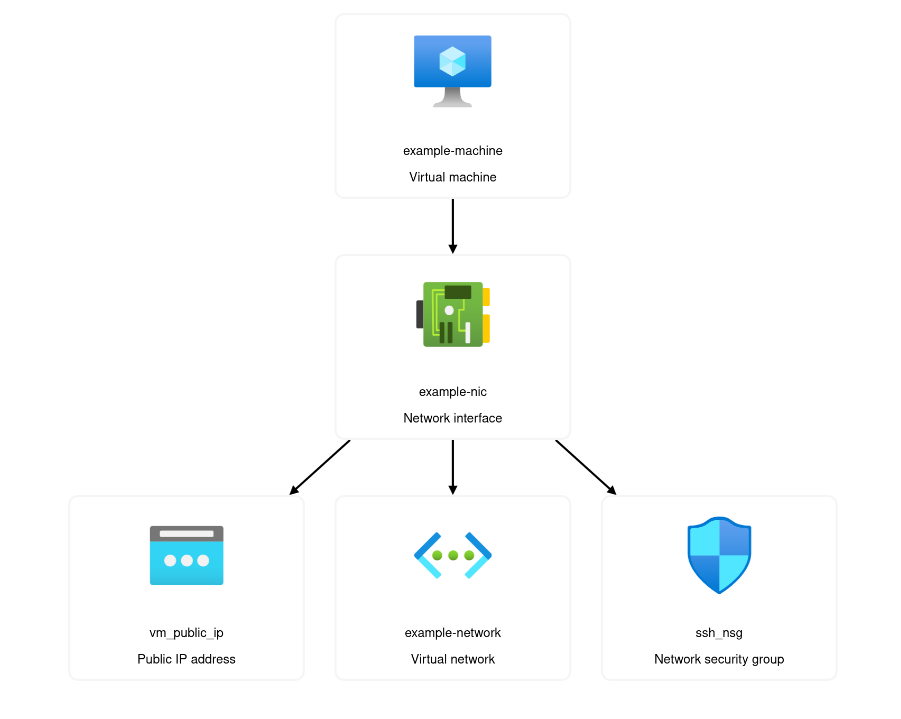
Azure resource visualizer
You can see all resources created in form of a diagram in the Azure portal. Go to the resource group, you will find the resources visualizer option on the left side.
Destroy Infra
After using Azure VM, we want to destroy it to save money. Terraform can do that with a single command. It will ask you again for confirmation, give it yes
terraform destroy