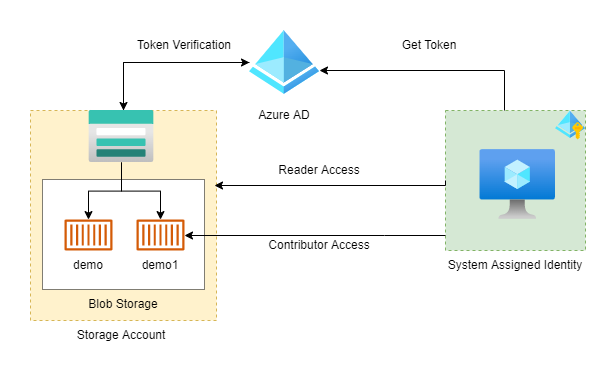
In this blog post, we will start exploring identities & Role-based access control (RBAC) in Azure for accessing different Azure resources from applications. We will create an infrastructure consisting Azure Storage Account which will be having 2 blob storage containers. We will also create one virtual machine which will be allowed as a Reader for that storage account and also a Contributor for one of the blob storage containers.
What is System Assigned Identity?
Azure will give some ID in Azure Active Directory to azure resources which are created by us. This kind of ID will get created at the time of resource created & gets destroyed at the time of resource destruction. only that Azure resources can use this identity to request tokens from Azure AD.
You can't share these IDs with other Azure resources. It is meant for only that resource.
All code used in this post is available at https://github.com/lets-learn-it/terraform-learning/tree/azure/07-system-assigned-identities
Plan of Action
- Creating resource group, vnet, & 1 public subnet.
- A virtual machine in public subnet with SSH access allowed & also system assigned identity.
- Storage account with 2 blob storage containers.
- Role assignments
- Checking access from the virtual machine
We will create 2 modules for the Virtual machine & Storage account. Below is my folder structure

Creating RG, Vnet & subnet
Resource Group
All resources will be placed in this single resource group.
resource "azurerm_resource_group" "example" {
  name     = var.resource_group_name
  location = "East US"
}
Vnet & public subnet
We need one public subnet for virtual machines & make sure to specify a service endpoint for storage.
resource "azurerm_virtual_network" "example" {
  name                = "example-network"
  address_space       = ["10.0.0.0/16"]
  location            = azurerm_resource_group.example.location
  resource_group_name = azurerm_resource_group.example.name
}

resource "azurerm_subnet" "public_subnet" {
  name                 = "public_subnet"
  resource_group_name  = azurerm_resource_group.example.name
  virtual_network_name = azurerm_virtual_network.example.name
  address_prefixes     = ["10.0.1.0/24"]
  service_endpoints    = ["Microsoft.Storage"]
}
Creating Virtual Machine (Module)
Creating Public IP
We need public IP so that we can SSH into this machine.
resource "azurerm_public_ip" "public_ip" {
  name                = format("%s_%s", var.name, "ip")
  resource_group_name = var.resource_group_name
  location            = var.location
  allocation_method   = "Dynamic"
}
Network Interface
resource "azurerm_network_interface" "example" {
  name                = format("%s_%s", var.name, "network_interface")
  location            = var.location
  resource_group_name = var.resource_group_name

  ip_configuration {
    name                          = "internal"
    subnet_id                     = var.subnet_id
    private_ip_address_allocation = "Dynamic"
    public_ip_address_id          = azurerm_public_ip.public_ip.id
  }
}
Network Security Group
While creating NSG, make sure to open port 22 for protocol TCP (for SSH access). Associate network interface (previously created) with NSG.
resource "azurerm_network_security_group" "nsg" {
  name                = format("%s_%s", var.name, "nsg")
  location            = var.location
  resource_group_name = var.resource_group_name

  security_rule {
    name                       = "allow_ssh_sg"
    priority                   = 100
    direction                  = "Inbound"
    access                     = "Allow"
    protocol                   = "Tcp"
    source_port_range          = "*"
    destination_port_range     = "22"
    source_address_prefix      = "*"
    destination_address_prefix = "*"
  }

  depends_on = [
    azurerm_network_interface.example
  ]
}

resource "azurerm_network_interface_security_group_association" "association" {
  network_interface_id      = azurerm_network_interface.example.id
  network_security_group_id = azurerm_network_security_group.nsg.id
}
Virtual Machine
Now create a virtual machine with system assigned identity
resource "azurerm_linux_virtual_machine" "example" {
  name                = format("%s%s", var.name, "vm")
  resource_group_name = var.resource_group_name
  location            = var.location
  size                = "Standard_B1s"
  admin_username      = "adminuser"

  network_interface_ids = [
    azurerm_network_interface.example.id,
  ]

  admin_ssh_key {
    username   = "adminuser"
    public_key = file(var.public_key_path)
  }

  os_disk {
    caching              = "ReadWrite"
    storage_account_type = "Standard_LRS"
  }

  source_image_reference {
    publisher = "Canonical"
    offer     = "UbuntuServer"
    sku       = "16.04-LTS"
    version   = "latest"
  }

  identity {
    type = "SystemAssigned"
  }
}
We need to output some variables which are required while creating infrastructure like principal_id for role assignment.
output "public_ip" {
  value = azurerm_public_ip.public_ip.ip_address
}

output "vm_id" {
  value = azurerm_linux_virtual_machine.example.id
}

output "vm_pricipal_id" {
  value = azurerm_linux_virtual_machine.example.identity[0].principal_id
}
Now, use the above module & create a virtual machine but make sure to declare all variables used in that module.
module "vm" {
    source = "./vm/"

    resource_group_name = azurerm_resource_group.example.name
    location            = azurerm_resource_group.example.location
    public_key_path     = "<public_key_path>"
    name                = "demo"
    subnet_id           = azurerm_subnet.public_subnet.id
}
Creating Storage Account
Module for the storage account
resource "azurerm_storage_account" "storage" {
  name                     = format("%s%s", var.name, "storage9553")
  resource_group_name      = var.resource_group_name
  location                 = var.location
  account_tier             = "Standard"
  account_replication_type = "LRS"

  network_rules {
      default_action = "Deny"
      ip_rules = var.white_list_ip
      virtual_network_subnet_ids = var.whitelist_subnet_ids
  }

  tags = {
    environment = "staging"
  }
}
Let's output some variables like storage_account_id
output "storage_account_id" {
    value = azurerm_storage_account.storage.id
}
Using storage account module & create infrastructure & also create 2 blob storage containers. Make sure to add your IP to the list white_list_ip else terraform unable t create containers.
module "storage_account" {
    source = "./storageaccount"

    resource_group_name = azurerm_resource_group.example.name
    location            = azurerm_resource_group.example.location
    name                = "demo12"
    # whitelist ip of machine from which terraform creating infra
    # else terraform apply will fail with 403
    white_list_ip        = ["106.210.242.214"]
    whitelist_subnet_ids = [azurerm_subnet.public_subnet.id]
}

resource "azurerm_storage_container" "container" {
  name                  = "demo"
  storage_account_name  = module.storage_account.storage_account_name
  container_access_type = "private"
  depends_on = [
    module.storage_account
  ]
}

resource "azurerm_storage_container" "container2" {
  name                  = "demo1"
  storage_account_name  = module.storage_account.storage_account_name
  container_access_type = "private"
  depends_on = [
    module.storage_account
  ]
}
Role Assignments
We will assign Reader role to storage account & Storage Blob Data Contributor role to demo1 container. This means we can list containers in the storage account but are only able to write in demo1 container. The above 2 roles are already defined by Azure so no need to create them.
# Read role for storage account
resource "azurerm_role_assignment" "storage" {
    scope = module.storage_account.storage_account_id

    # using azure defined role
    role_definition_name = "Reader"

    principal_id = module.vm.vm_pricipal_id
}

# Write role for container
resource "azurerm_role_assignment" "container" {
    scope = azurerm_storage_container.container2.resource_manager_id

    # using azure defined role
    role_definition_name = "Storage Blob Data Contributor"

    principal_id = module.vm.vm_pricipal_id
}
When you apply the above terraform code, it will create 13 resources.
Checking Access from VM
Connect to the virtual machine using SSH
ssh -i <pvt_key> adminuser@<vm_ip>Install az CLI in that machine. It depends on your machine's OS. If you used the same OS as I used then check https://docs.microsoft.com/en-us/cli/azure/install-azure-cli-linux?pivots=apt
Login
# login using identity
az login --identity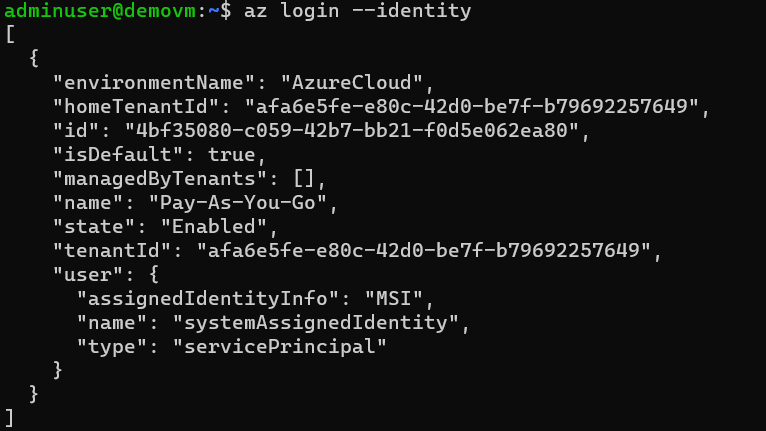
List containers
# list containers
# make sure that --auth-mode is login
az storage container list --account-name demo12storage9553 --auth-mode login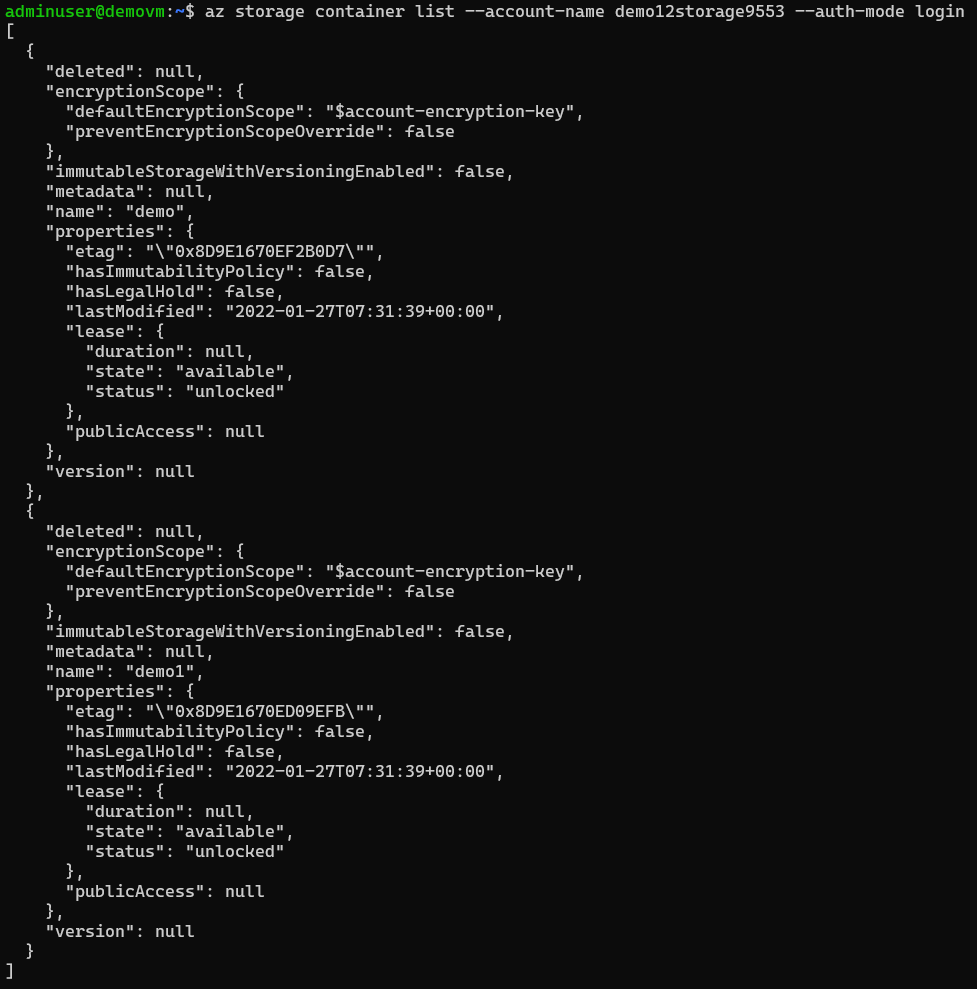
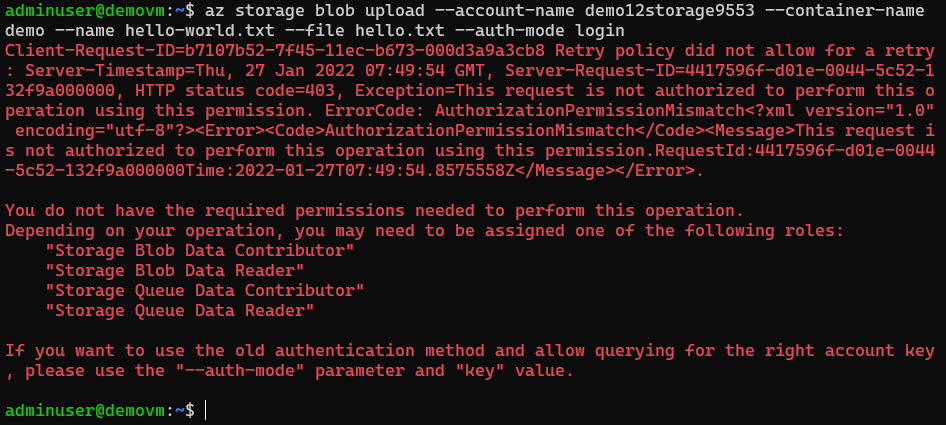
Upload File in demo1
First create one file.
echo "Hello World" > hello.txtNow, upload hello.txt to demo1
# upload to demo2.
az storage blob upload --account-name demo12storage9553 --container-name demo1 --name hello-world.txt --file hello.txt --auth-mode login
Upload file in demo
VM doesn't have write access to demo the container. Let's try to upload file in demo
The End
Make sure to destroy all created resources.